Organization and Organization Settings
An organization is an entity that presents the house of multiple different video platforms. Organizations consist of different projects, each representing a Video Platform. The organization will be created by the VP Apps team, and the user can create projects based on their needs.
Organization Settings allows the Organization Owner to have an overview of the general settings and manage the projects, users and integrations within the organization.
Organization Settings consists of different pages, each dedicated for setting up specific functions.
Note: The access to organization settings is only possible if the account’s role is Organization Owner or Organization Administrator.
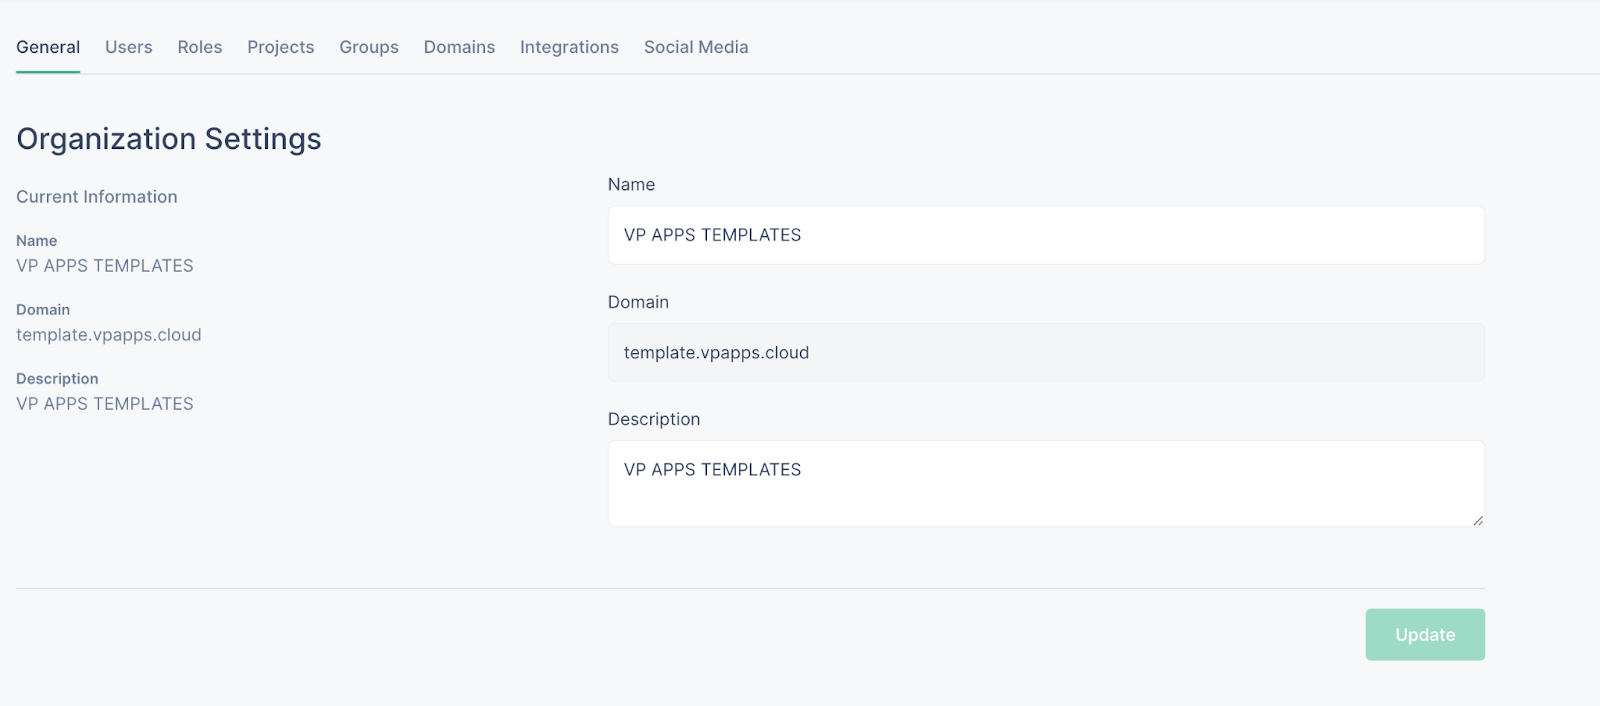
General
The General section consists of the name, description and the domain of the organization. This information is set up in the beginning when creating the organization. The name and the description of the organization can be updated later.
Users
The Users section allows the Organization Owner and Administrator(s) to have an overview of all the users in different projects within the organization. Through the users tab, the organization owner can add an administrator or transfer ownership to the organization. The Administrator has the same competencies as the Organization Owner.
Add a user to your organization
The Organization Owner can add an Administrator via Organization Settings. The Administrator has the same permissions as the Organization Owner, except that they would not be able to take over the role of the Organization Owner, unless ownership is transferred to them.
To add an Administrator, follow these steps:
- Go to Organization Settings via the dropdown menu on your profile
- Click on “New administrator”
- Write the email address of the user and click “Add”
- The user will accept the administrator role via their email
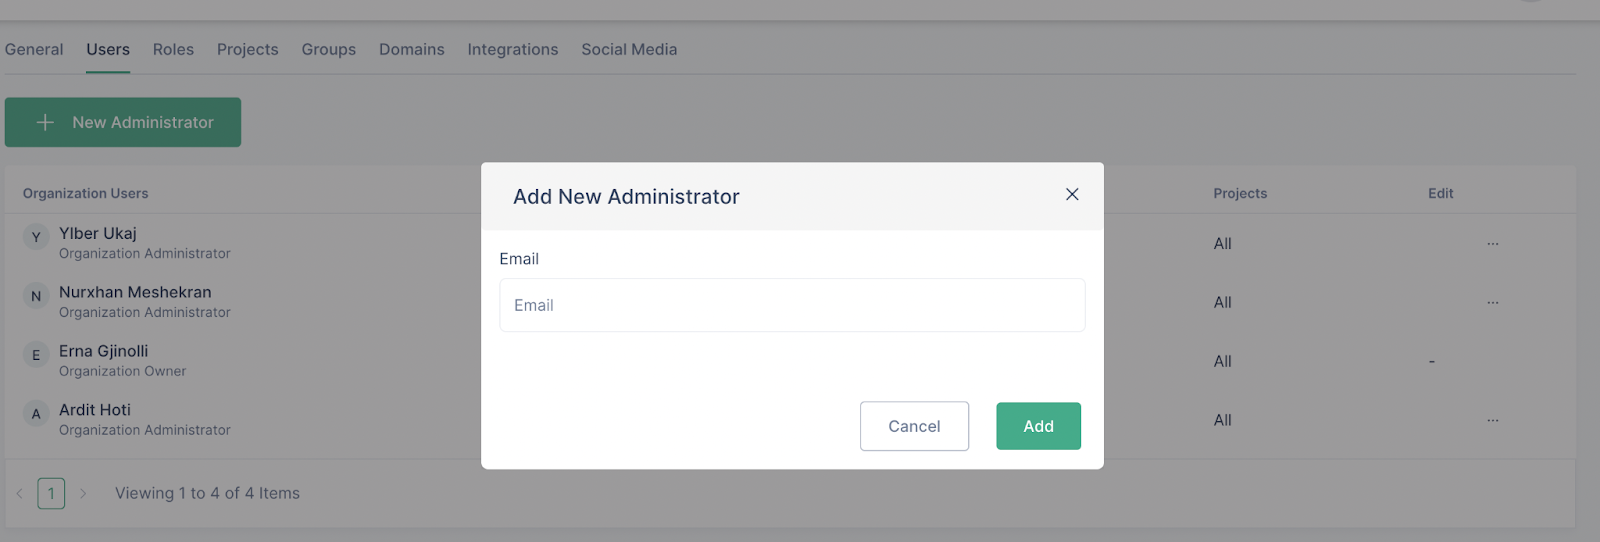
Note: If the invited user does not have an account on Porta authentication provider, they must register first to access the organization.
Note: In the Users page, the Organization Owner will see the administrators on the first table and will see the users from other projects on the second table.
Transfer ownership of Organization Owner to Organization Administrator
The Organization Owner can decide to transfer their ownership to an Organization Administrator i.e hand over the competencies, it can be done so by following these steps:
- Go to Organization Settings
- Enter the Users page
- On the right side of the user’s name, click on the three dots

- Click on “Transfer Ownership”
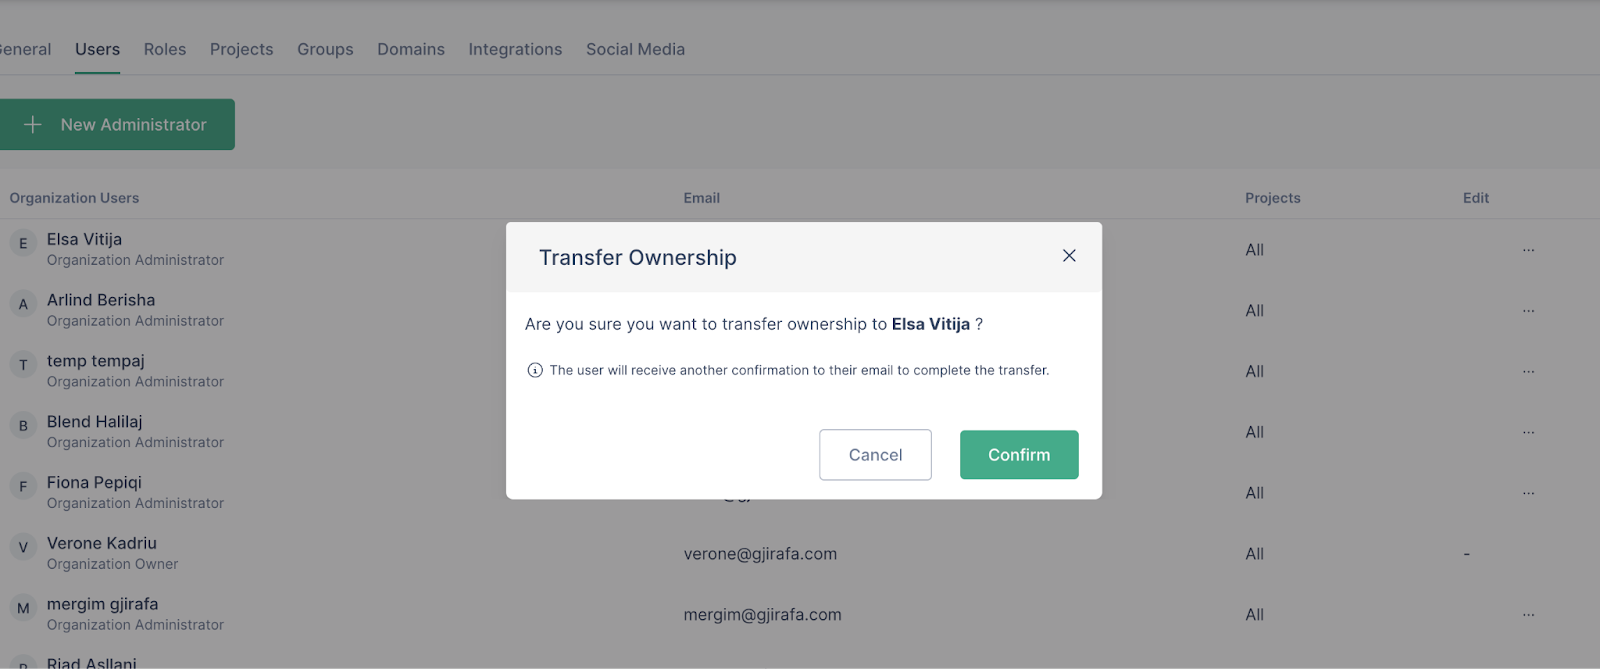
- Click on “Confirm”
- Once the user confirms the transfer of ownership, they should have the Organization Owner role.
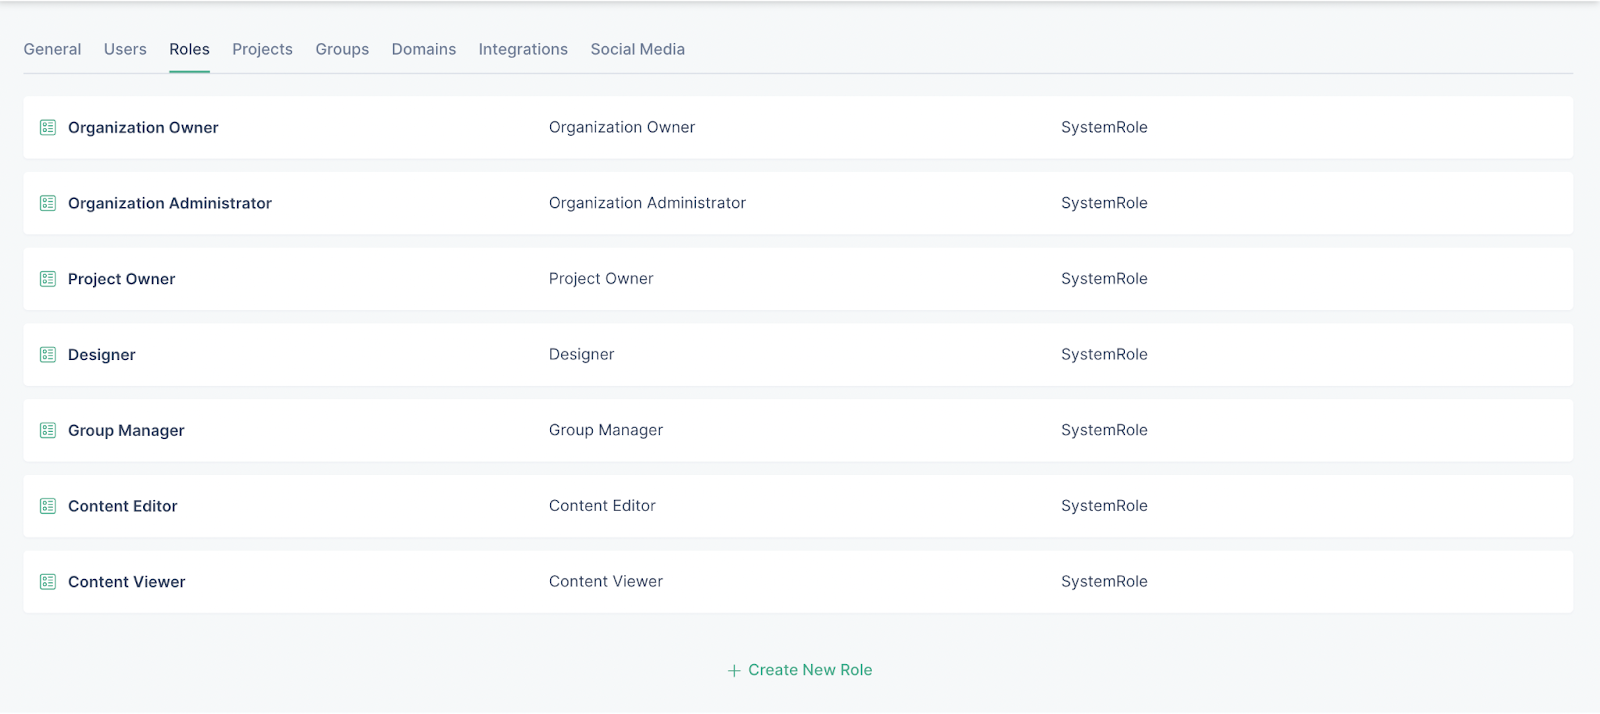
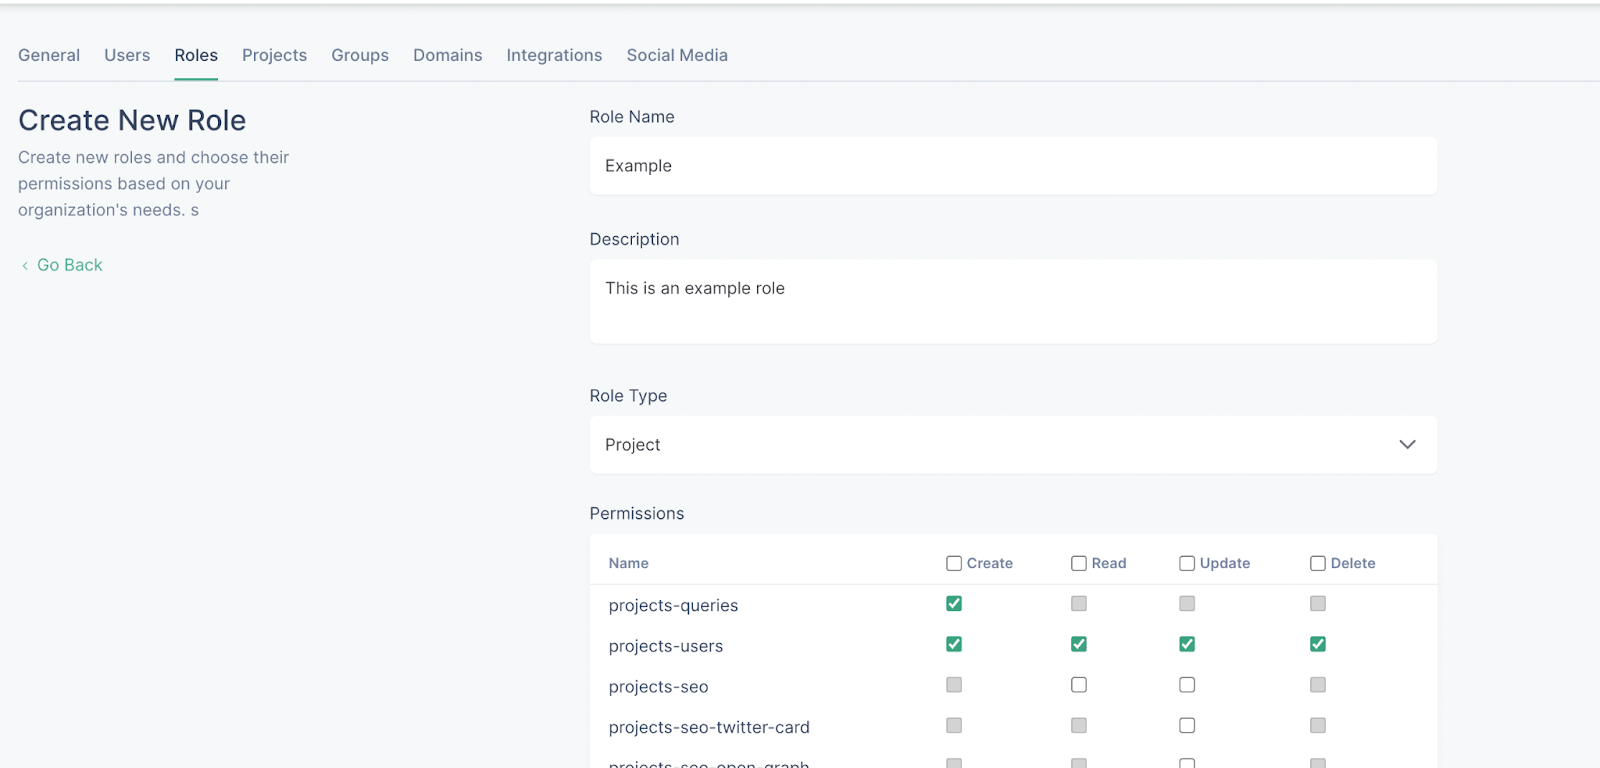
Roles
The Roles section is where the organization owner or administrator can view the existing system roles and create new roles with permissions based on the needs of the organization.
Create a role
In VP Apps, there are two types of roles: System and Custom roles.
System roles are the one that the user finds by default on the platform and have the set permissions. Custom roles are other roles that the Organization Owner or Administrator, can create with specific permissions within the organization.
- Go to your organization
- Go to Organization Settings via the dropdown menu on your profile
- Navigate to the Roles tab.
- Click on “Create new role”
- Write the name of the role and its description.
- Choose the role type.
- Content role
- Project role
- Select the role permissions by checking the boxes.
Note: Some permissions cannot be set.
- Click on “Create new role”
- The created role will appear on the table as a Custom role
- It will be available to be assigned to the users in your organization
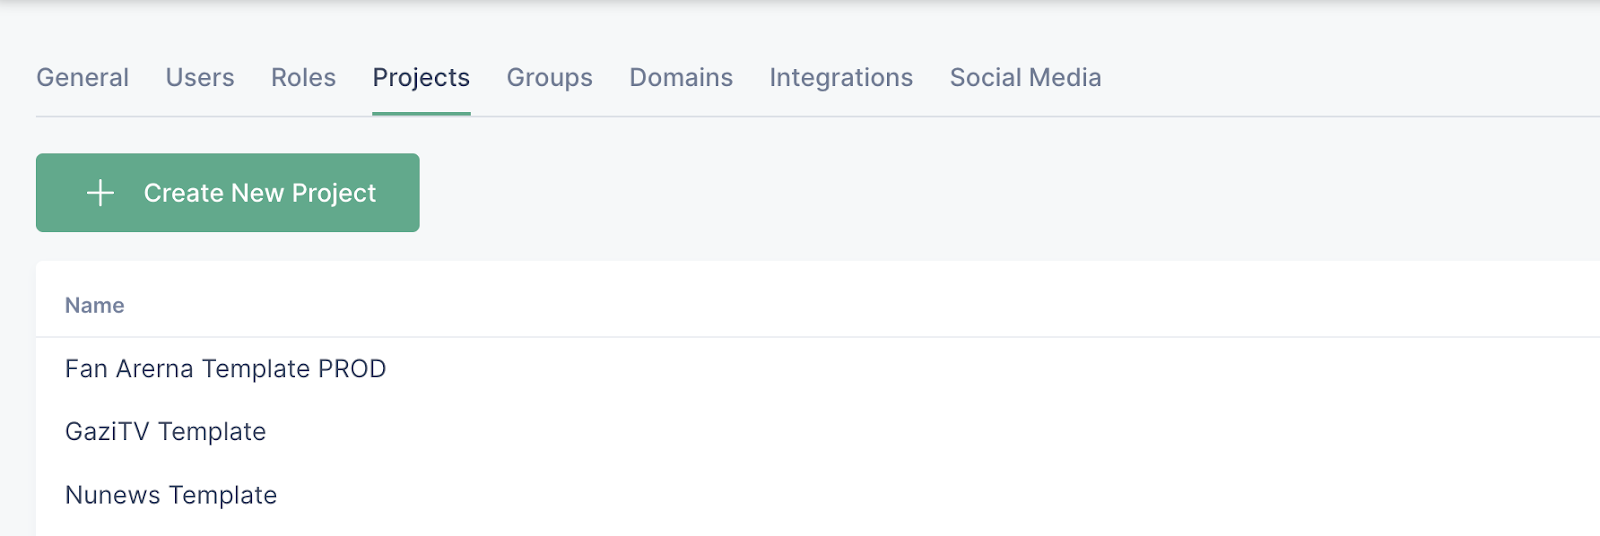
Projects
In the Projects section, the user can create a new project within the organization and manage other existing projects.
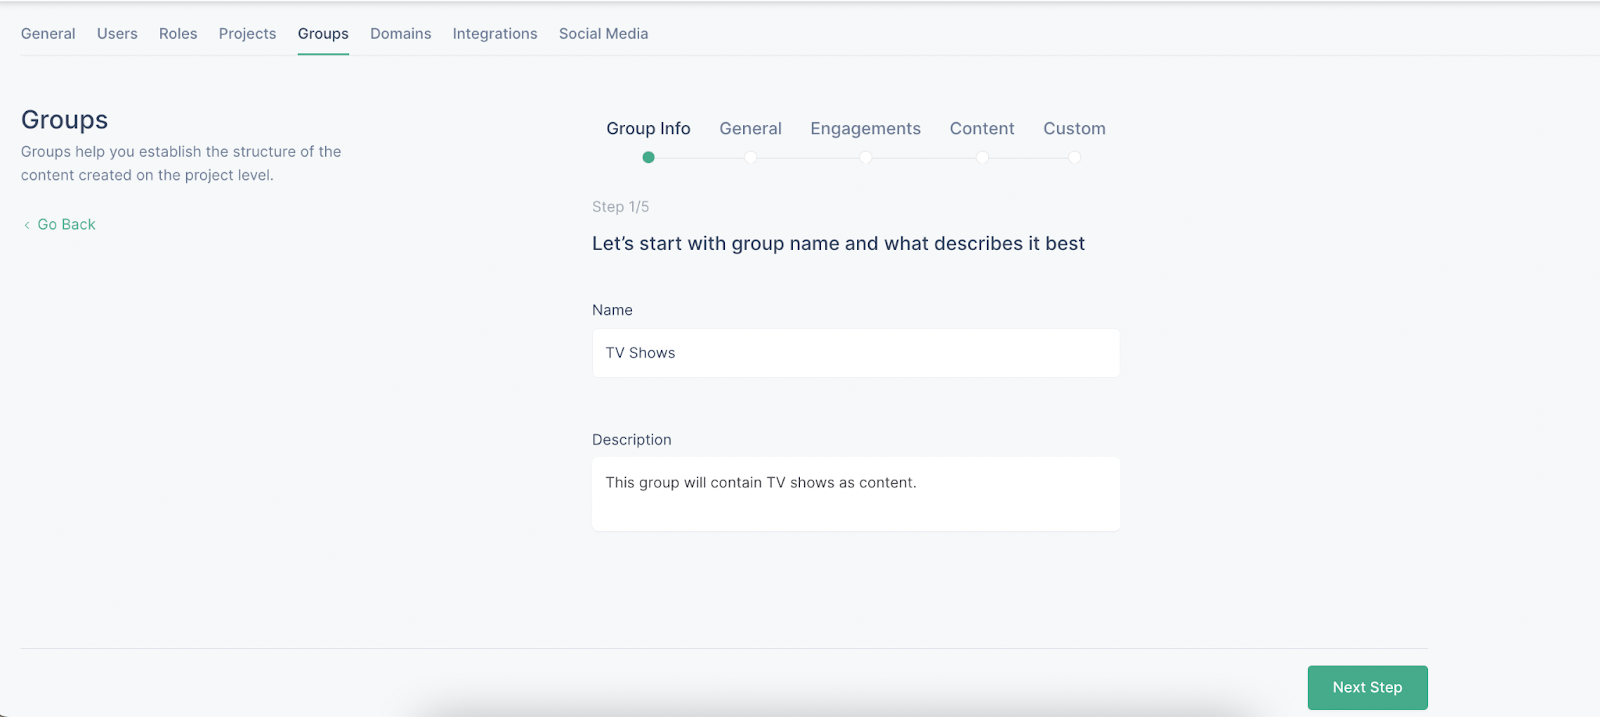
Groups
Here the user can create groups with different properties and assign content types. Groups represent content groupings that the user will set up in the organization.
Create a group
Groups can be created by Organization Owners or Administrators. Groups are created on an organization level, and their properties are applied to the content created in each project.
A project can have multiple groups. Follow these steps to create a group:
- Go to Organization Settings
- Navigate to the Groups tab
- Click on “Create new group”
- Fill in the name and the description of the group in the Group Info page.
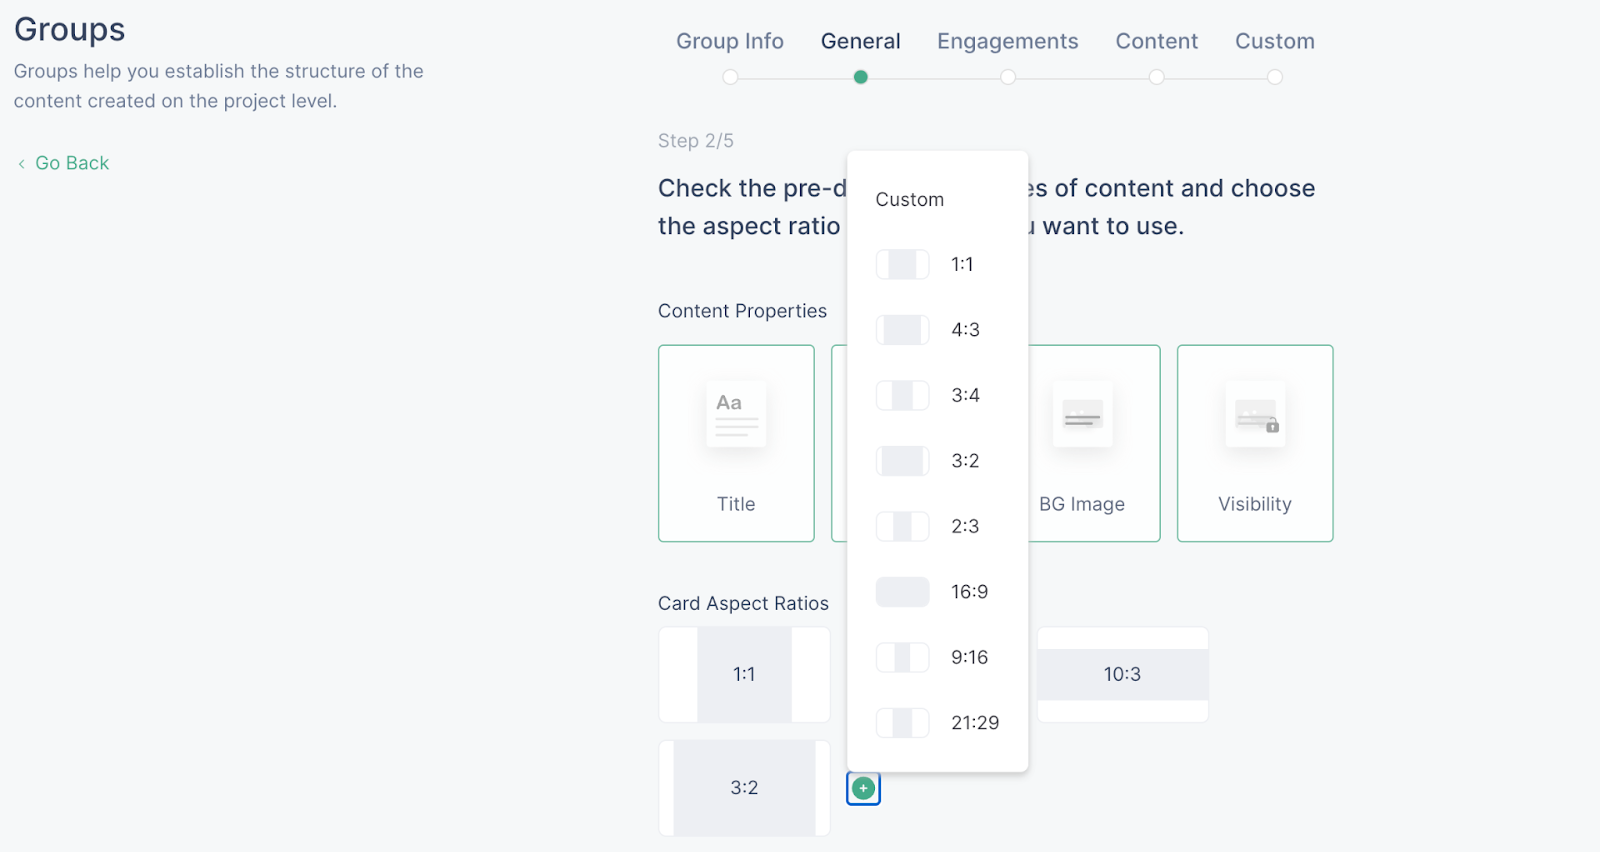
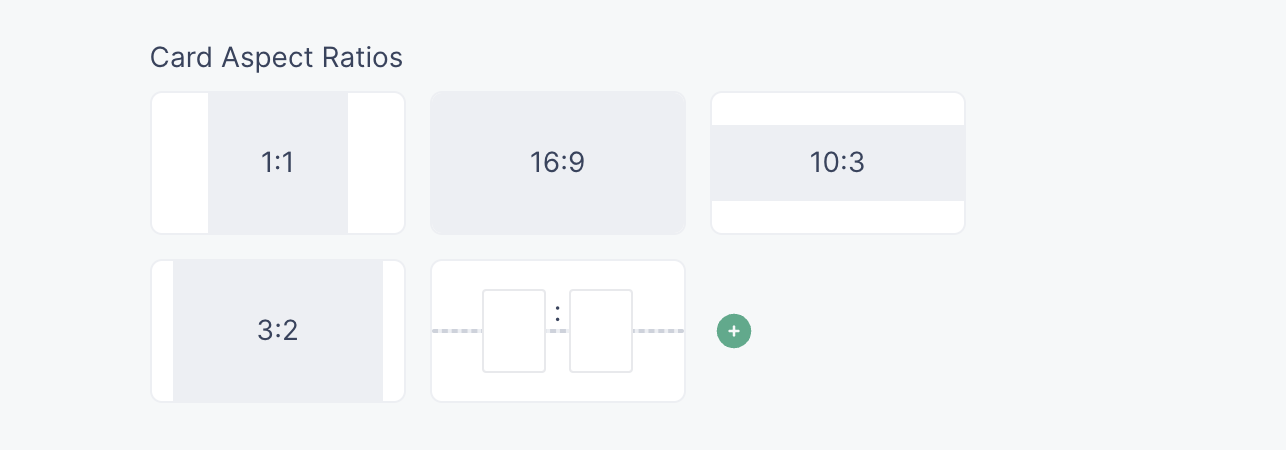
- In the General page, you can check the predefined properties that are assigned to the group and you can choose from the given aspect ratios for the group cards. You can also choose a custom aspect ratio.
- To select the custom aspect ratio, click on the Custom option, then add in the X and Y values (height x width)
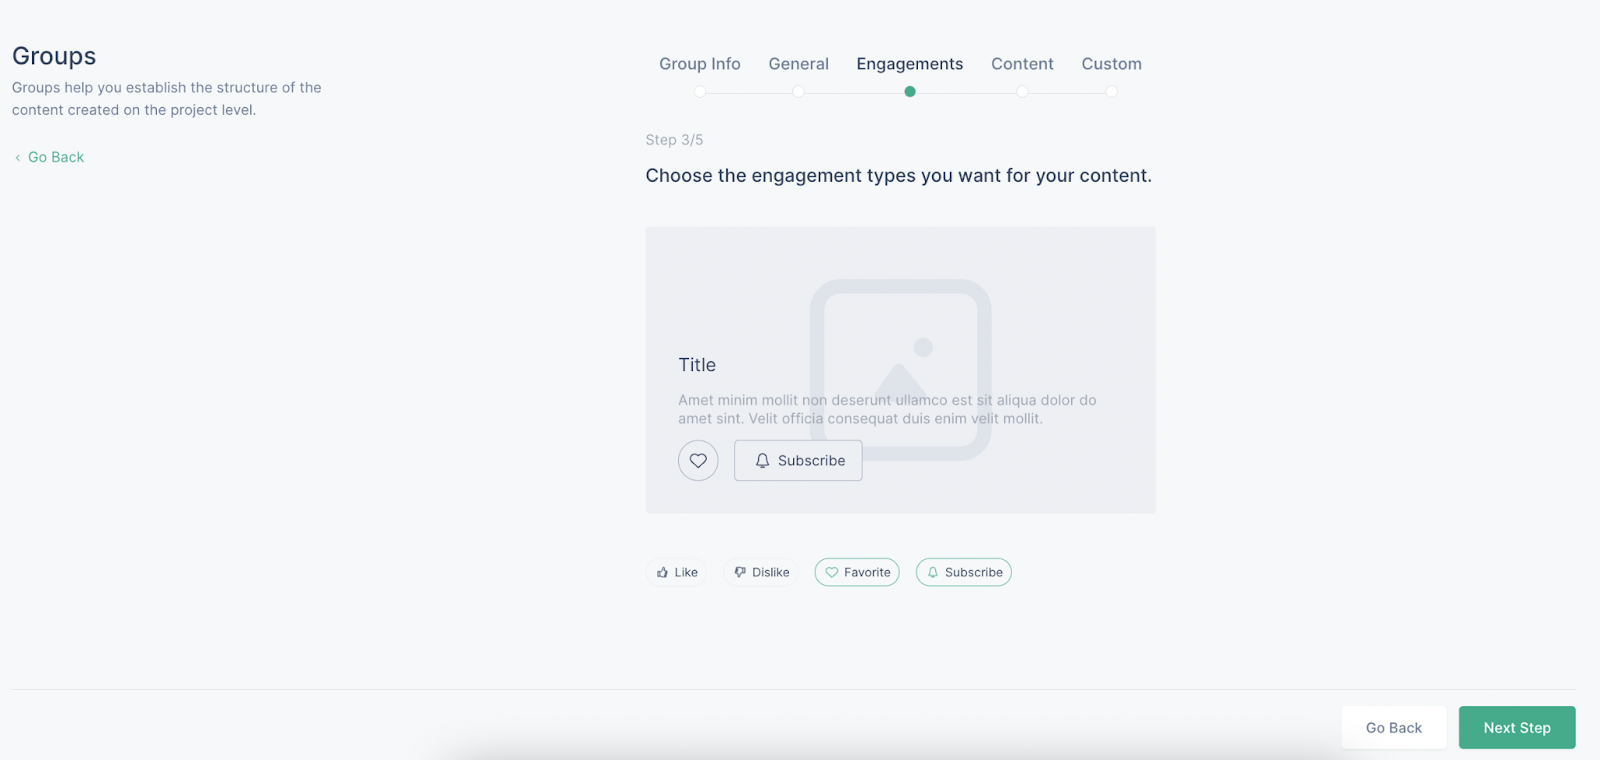
- Go to the Engagements page to choose the engagements that you want to allow for your group.
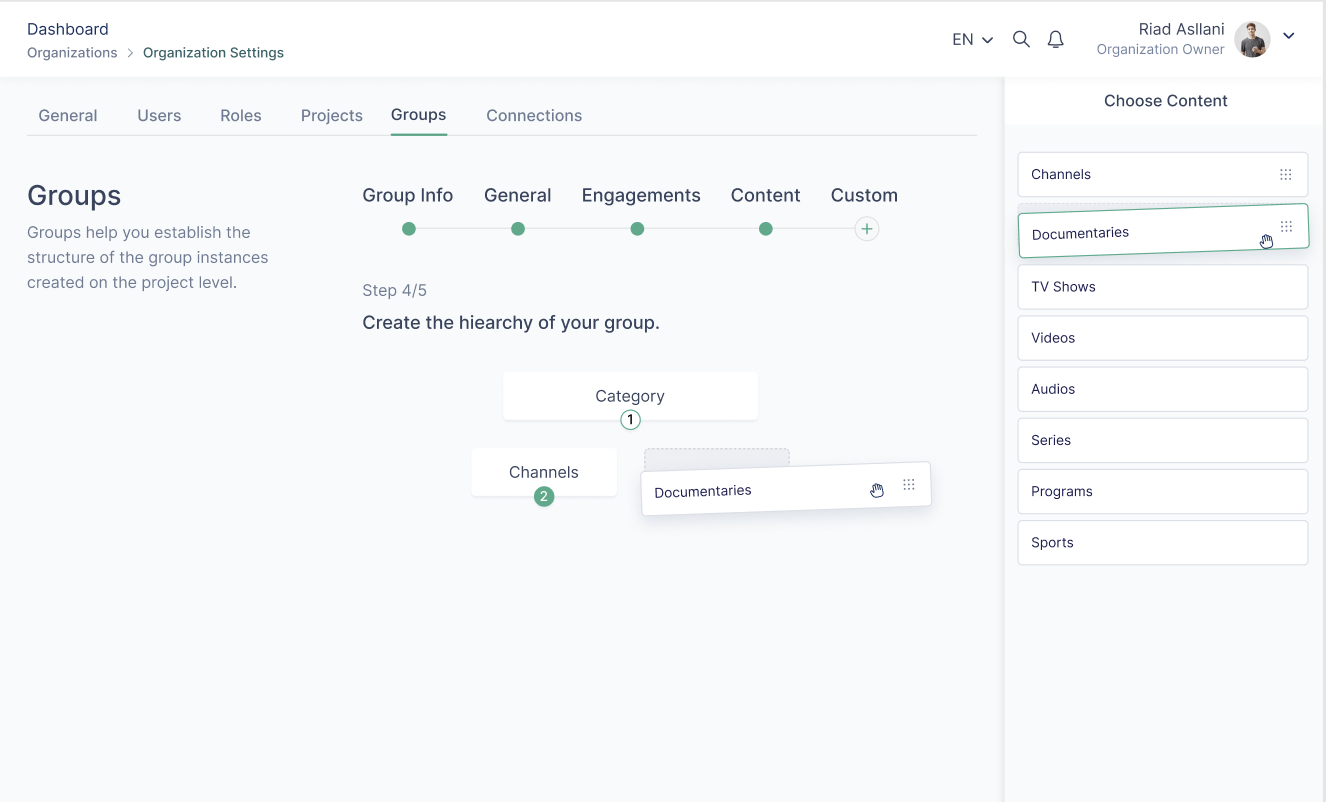
- In the Content page, choose the hierarchy of your group. The group can contain other created groups, videos or audios. Drag and drop the containers into the center of the page to define the hierarchy.
- In the Custom page, you can add custom properties. Click “Add new property” and use the dots to drag and drop one or more of the given property types to the center of the page. You can add as many properties as necessary by using the same steps.
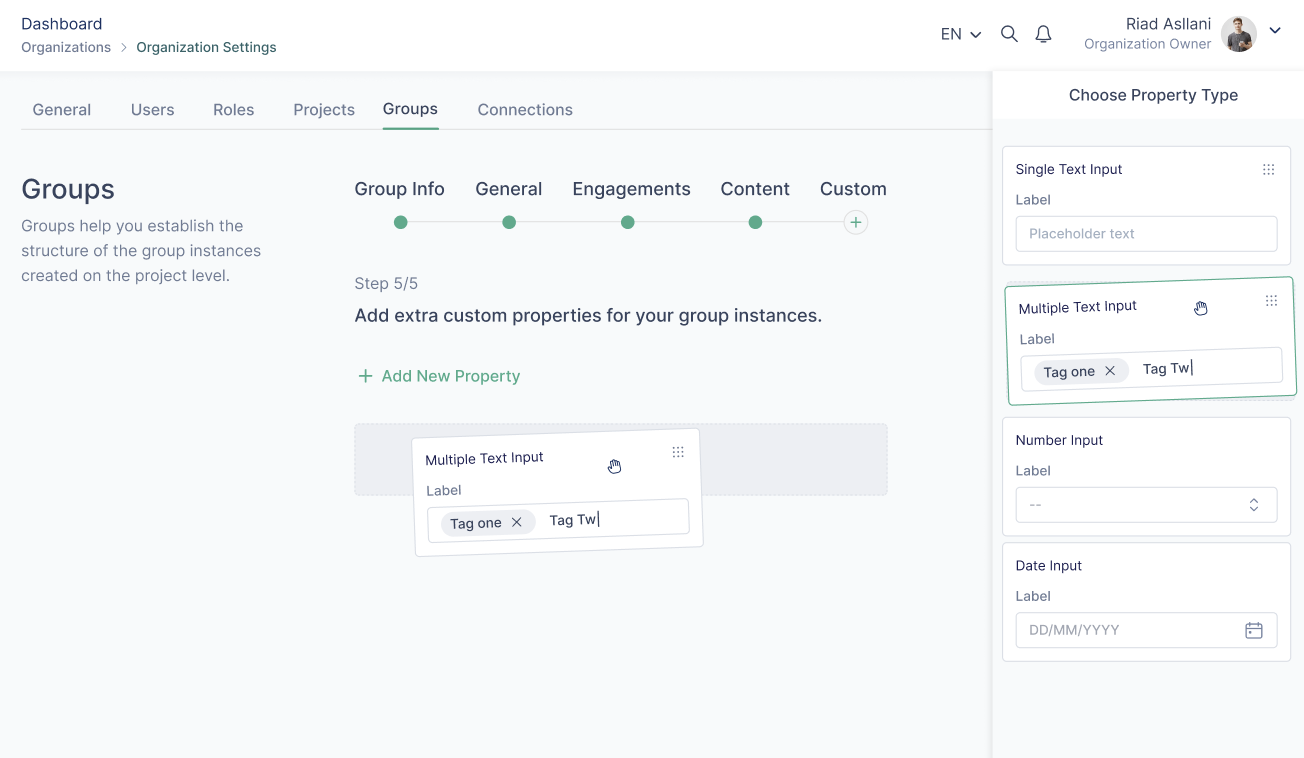
- You can delete properties by hovering over the property type and clicking on the “Bin” button.
- Check the “Make this property required” if the created property for your group will be required for the content created on project level.
- Check the “Make this property a list” if the created property will be a list.
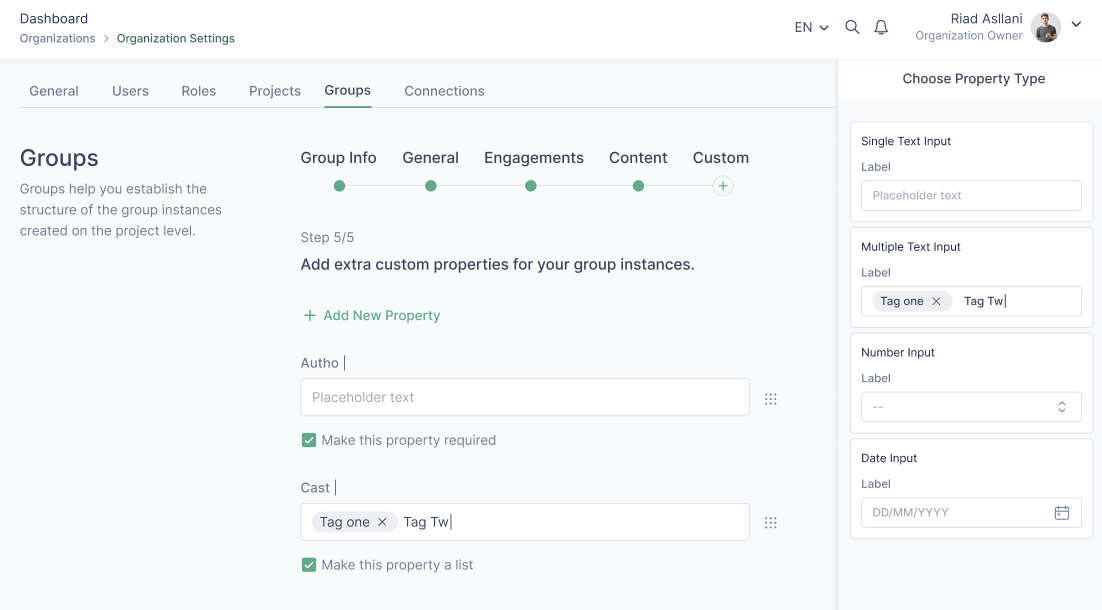
- Click on “Create group” and view the group in the listing page with the other groups.
- To use this on a project you need to go to project settings and select it as a group for the project.
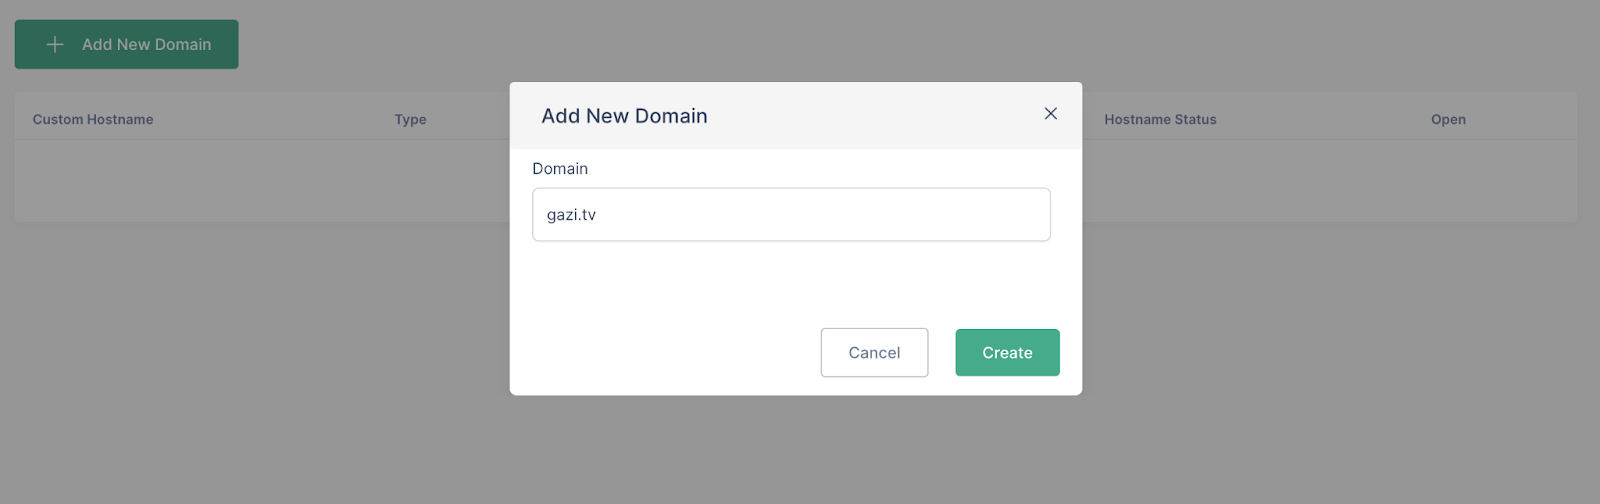
Domains
For each project, VP Apps automatically assigns a domain to test the platform. However, users have the flexibility to set up their own domain for their web platform in the Domain Section. It's important to note that VP Apps permits only one main domain, and any additional domains must be set as subdomains. The initial domain is allocated to the default project which is created together with the organization, while subsequent subdomains can be assigned to selected projects.
Add a domain to the project:
To add a domain, users should follow these steps:
- Log in to your Cloudflare/Namecheap account and select the domain you want to CNAME to VPAPPS.
- Click on the DNS tab at the top of the page.
- Scroll down to the "Records" section and click on "Add Record".
- Choose "CNAME" from the dropdown menu.
- In the "Name" field in Namecheap/Cloudflare, enter the subdomain you want to CNAME (e.g. this is the name filed in CNAME forwarding input in VPAPPS console).
- Go to VP Apps Dashboard > Organization Settings > Domains
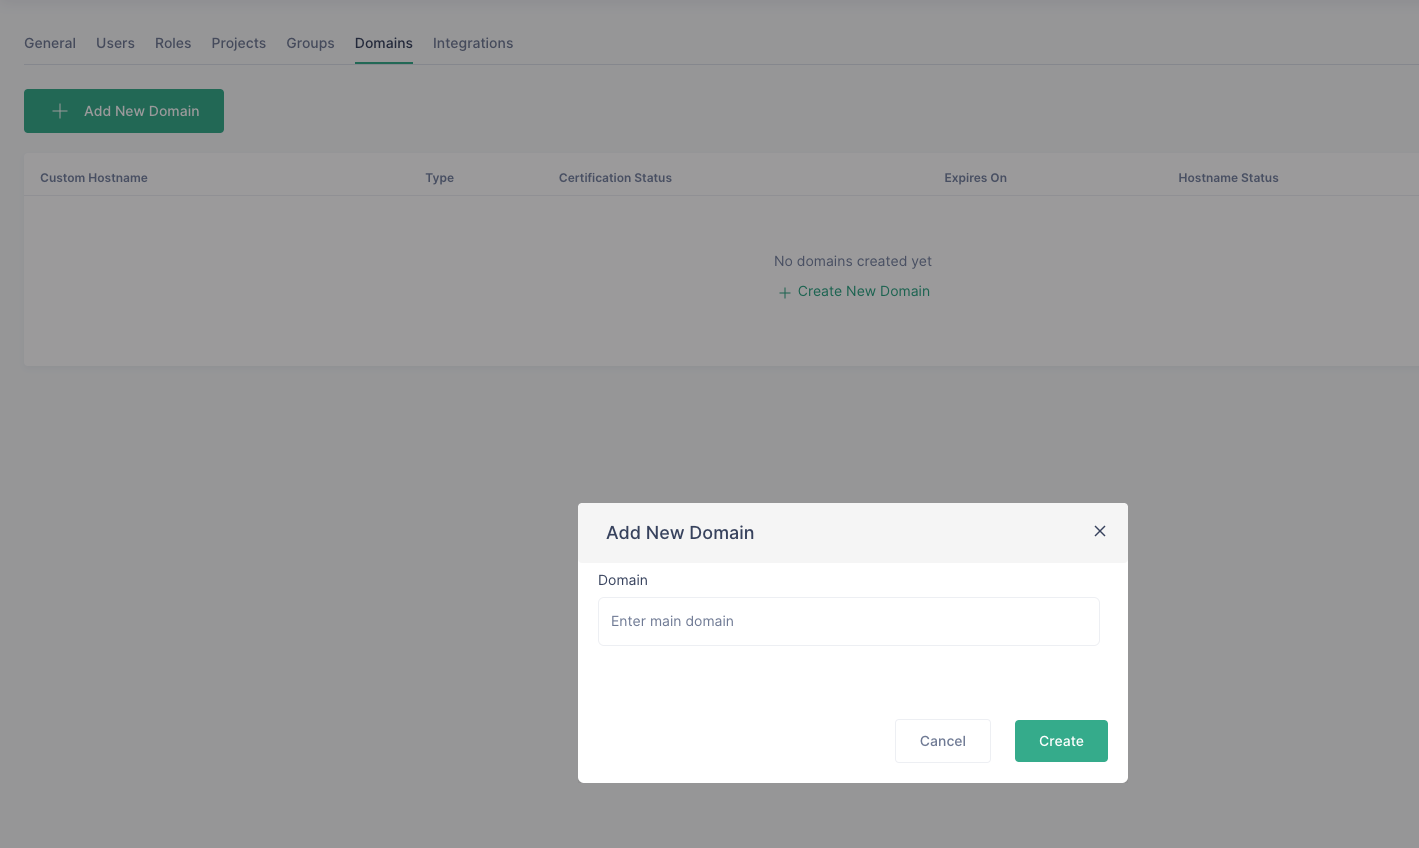
a. Add the new domain that you want to add:
- In the "Target" field in the Cloudflare/Namecheap, enter the external domain you want to CNAME to (e.g. This is Hostname forwarding CNAME value in VPAPPS console, with the format app-XY.vpapps.cloud).

- Click "Save".
- Scroll down to the "Records" section and click on "Add Record".
- Choose "TXT" from the dropdown menu.
- In the "Name" field, enter the input you get in the VPAPPS console [Certificate validation TXT name]

- In the "Target" field, enter the input you get in the VPAPPS console [Certificate validation TXT value]

- Click "Save".
- Wait for the DNS record to propagate. This can take anywhere from a few minutes to a few hours, depending on various factors such as TTL and DNS caching.
In the same way the user can also add other subdomains for other projects.
Integrations
Integrations is the section where the user can setup authentication providers, media providers and AI engines. By default there is integration setup by VP Apps team with Porta, TruAI and VP Player - part of gjirafatech ecosystem (read more here: https://gjirafa.tech/). If third party tools integrations are required please contact the VP Apps team.
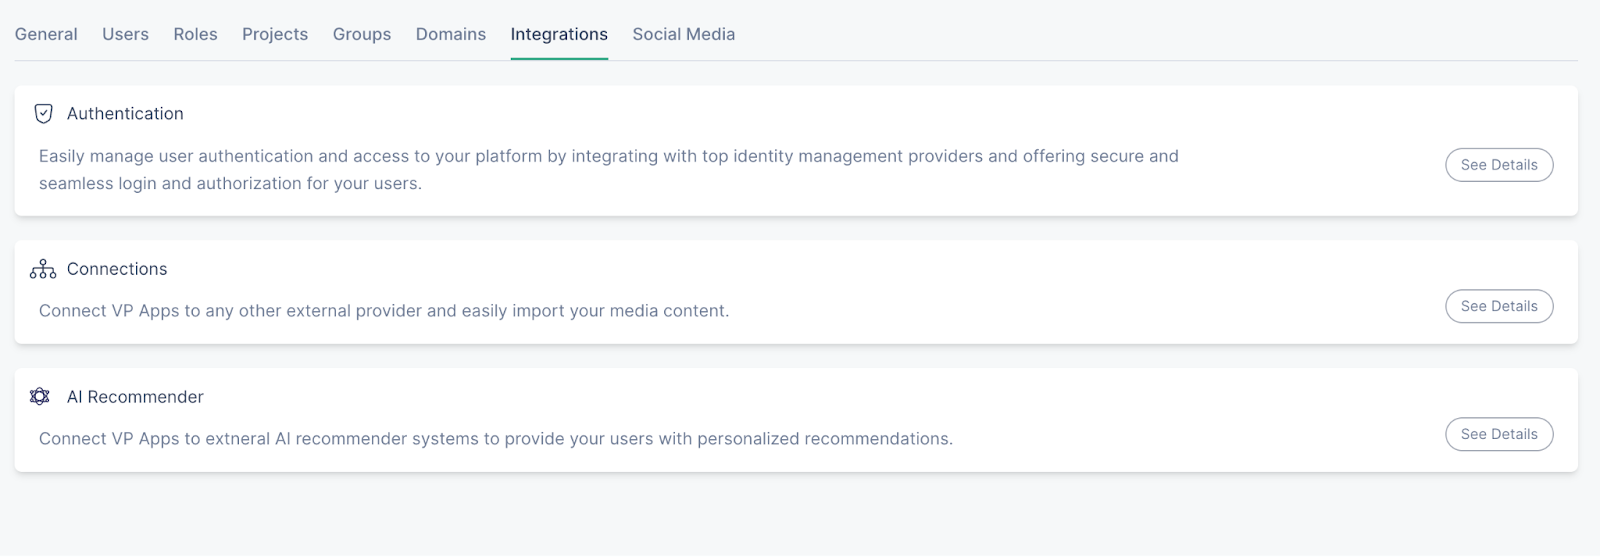
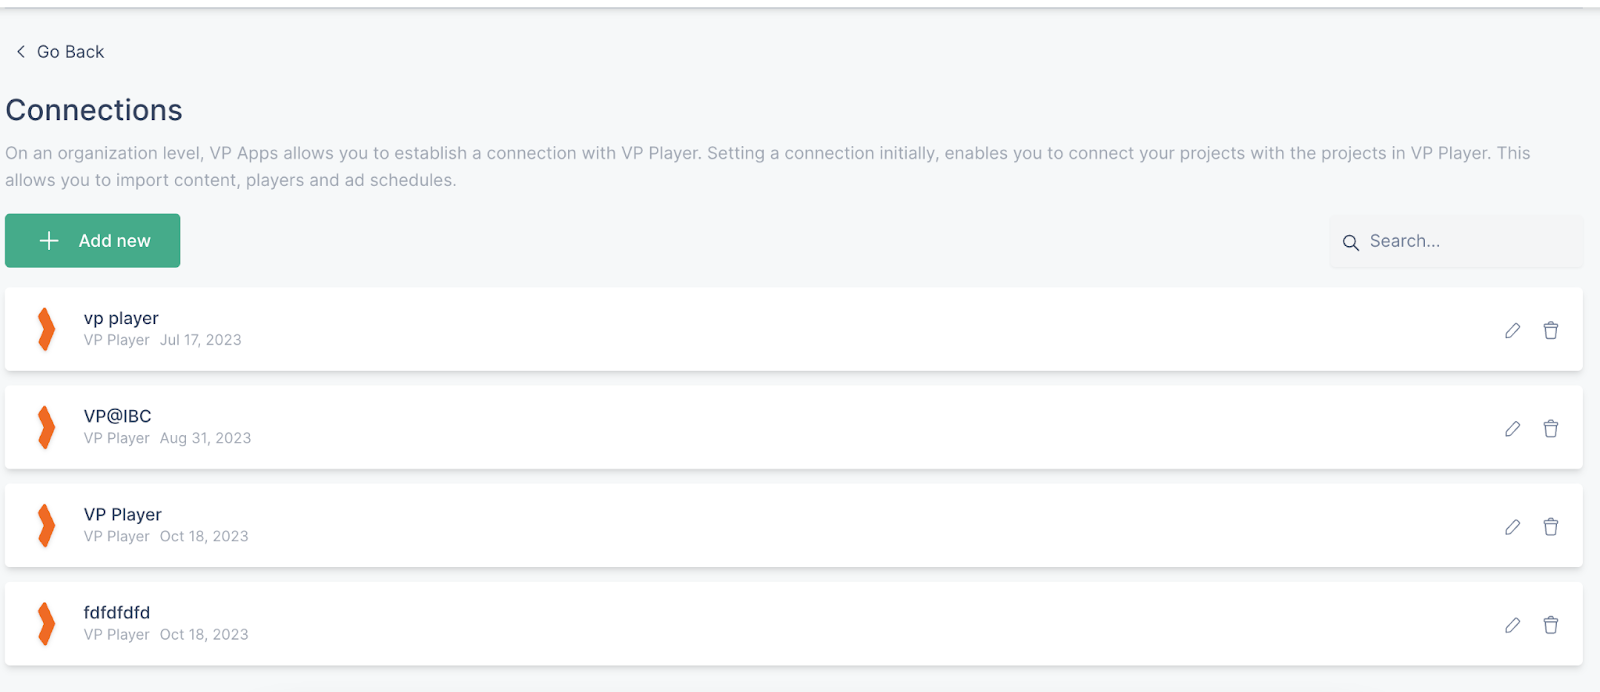
Connections
The Connections page allows the user to set up the connection with the media provider, which will then allow the import of media and players.
Integrations can only be set up if the user’s role is Organization Owner or Administrator.
The connection with VP Player can be setup following the steps below:
- Go to Connections page in Organization Settings
- Click on “Add new”
- Enter a name for your connection and add the API key which you retrieve from your project in VP Player
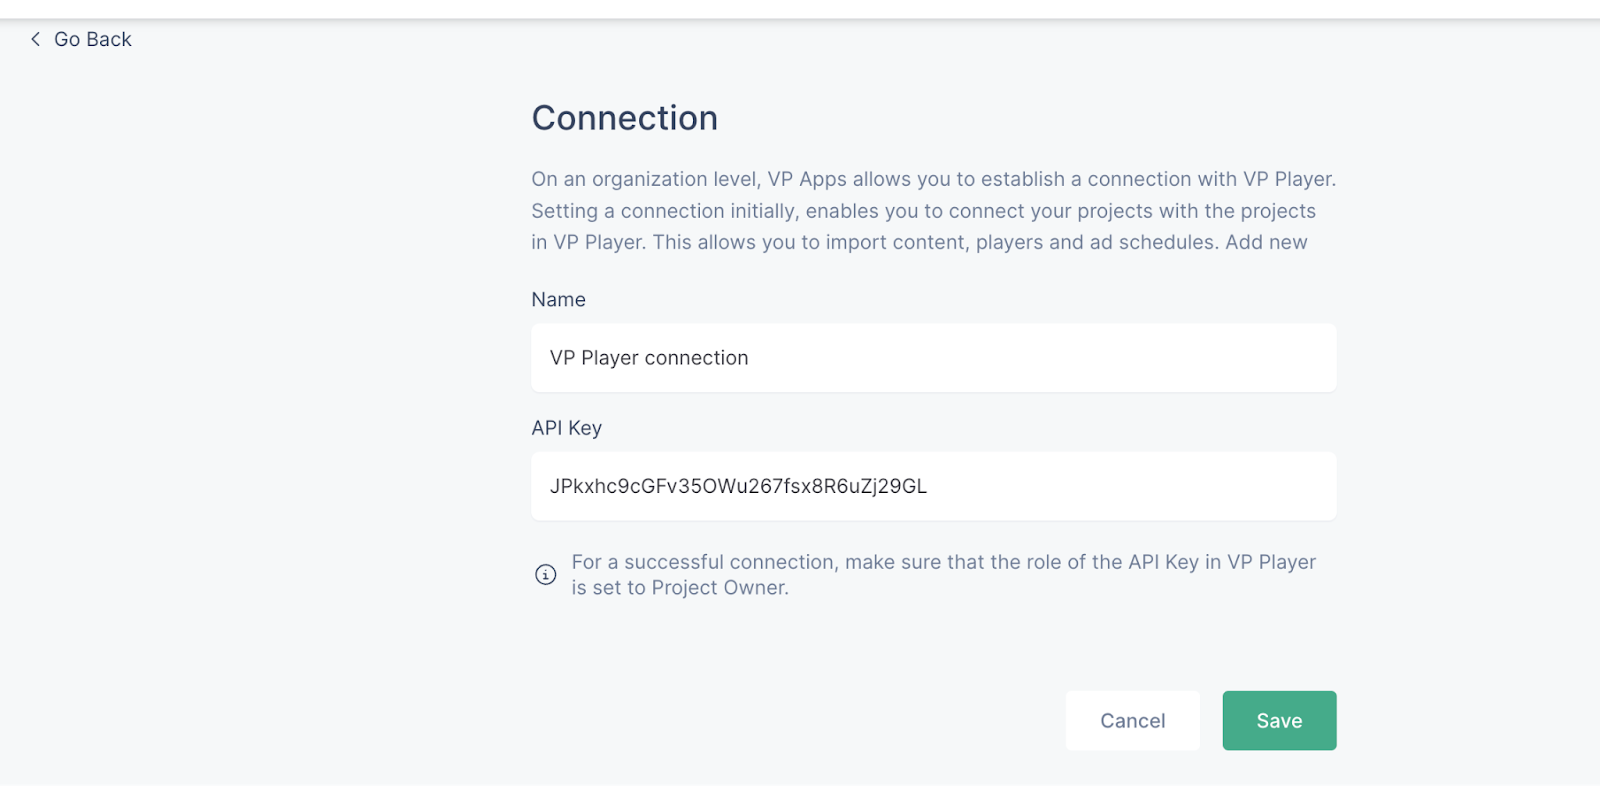
- Click on “Save”
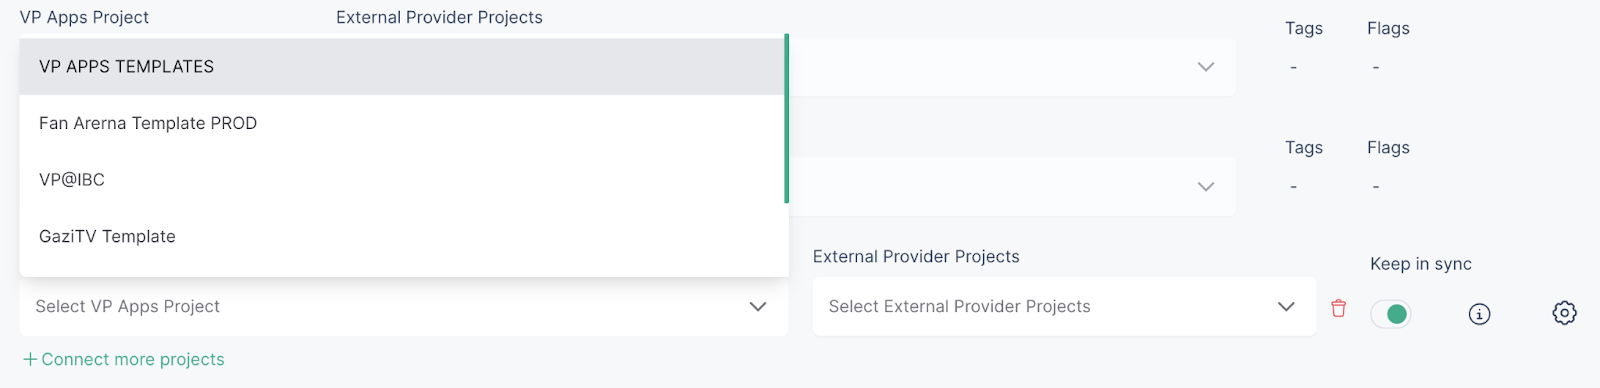
- Further, choose which project in the VP Apps organization will be connected to which project in VP Player
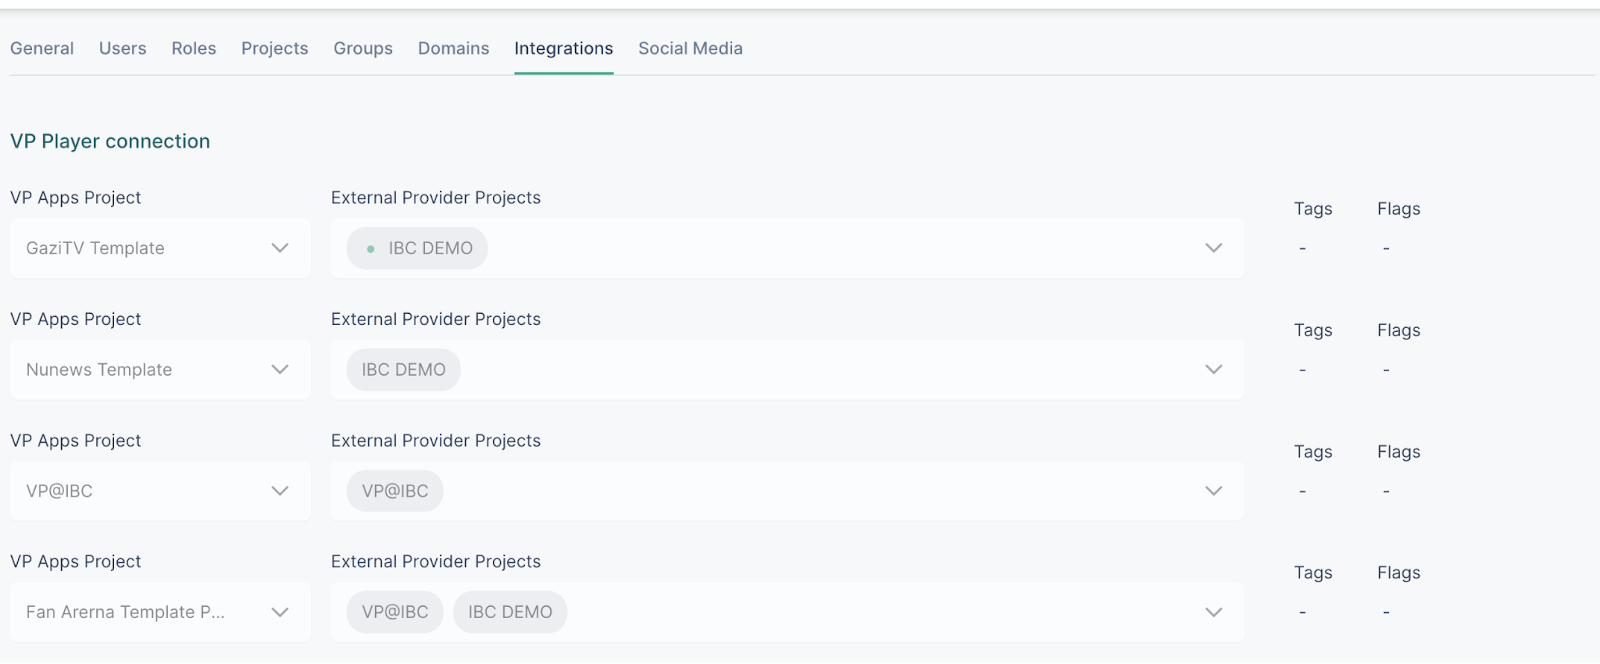
- Click on “Add more connections” button if additional connections are necessary
- Turn on the “Keep on sync” feature to stay up-to-date with any changes done on the VP Player’s side.
AI Recommender set up
The AI recommender offers the users the option to show relevant content to the audience based on their interaction with the platform.
The AI Recommender can only be set up if the users have the role of the Organization Owner or Administrator.
Setting it up:
- Go to Organization Settings
- Enter Integrations and then choose AI Recommender
- Click on “Create new”
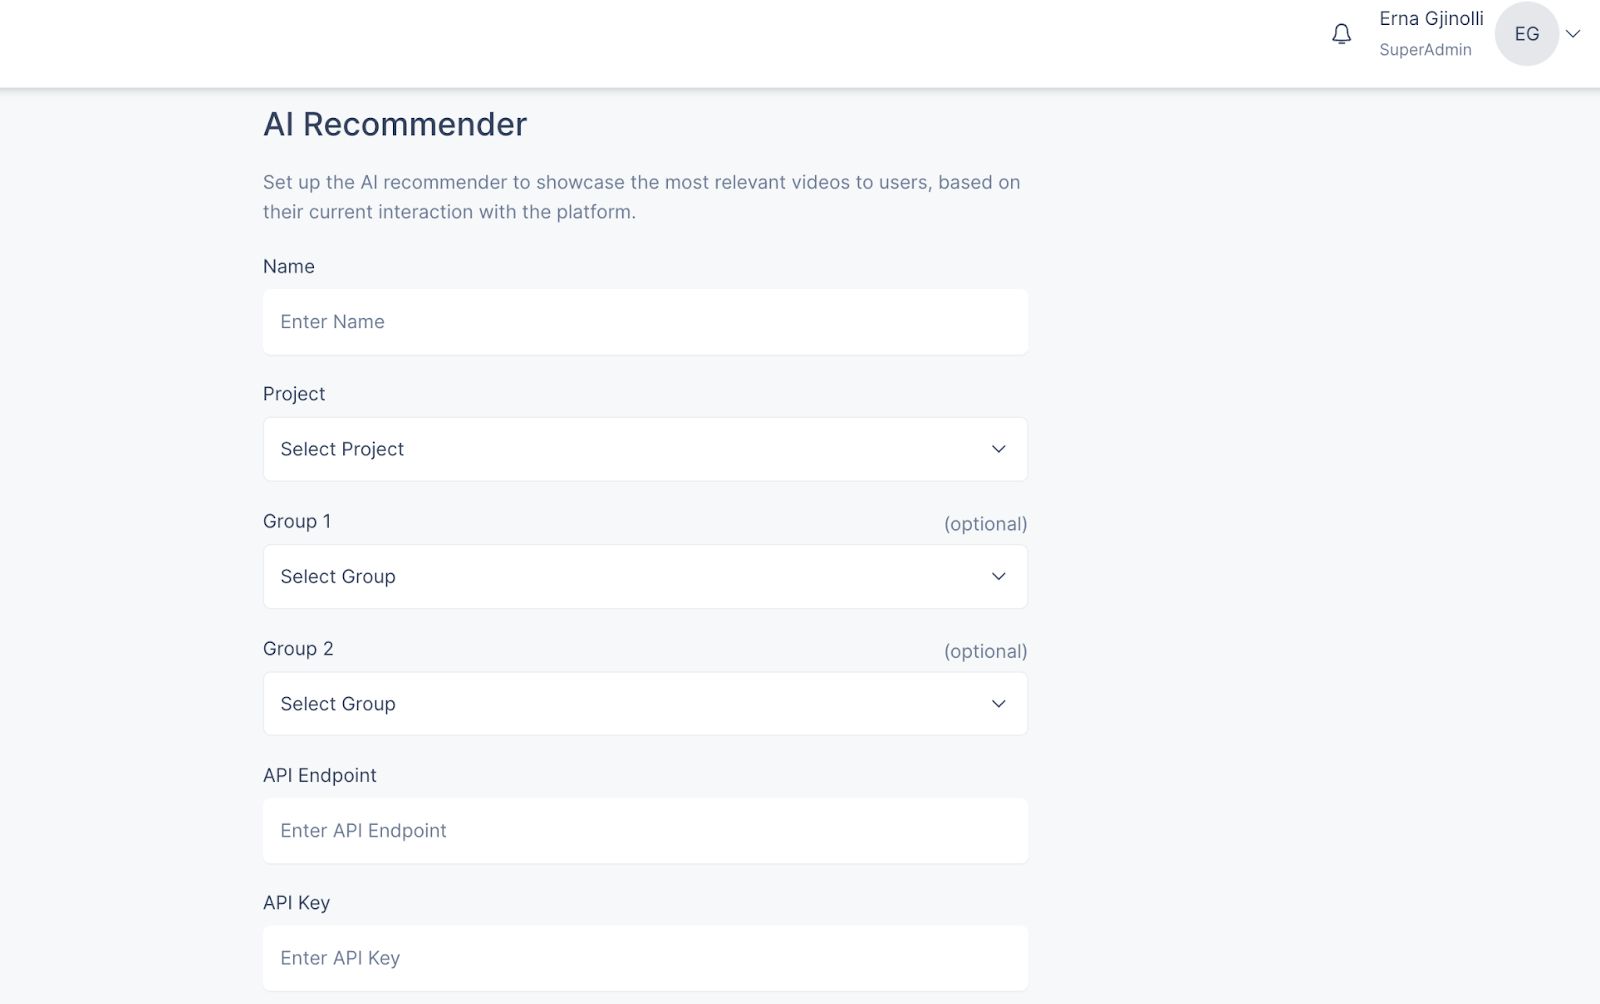
- Fill in the name and select a project that you would like to set up with the AI engine
- The selection of the groups is optional, however selecting those two groups will allow for choosing specific content to apply the AI recommender to
- Add the API endpoint and the API key, which will be provided by TruAI
- Click on “Save”
Social Media
The Social Media section offers the users to configure the logos and social media displayed on the footer and banners across their platforms.
To add the social media links to the project, do the following:
- If you have the Organization Owner or Administrator role, access the Social Media page via Organization Settings
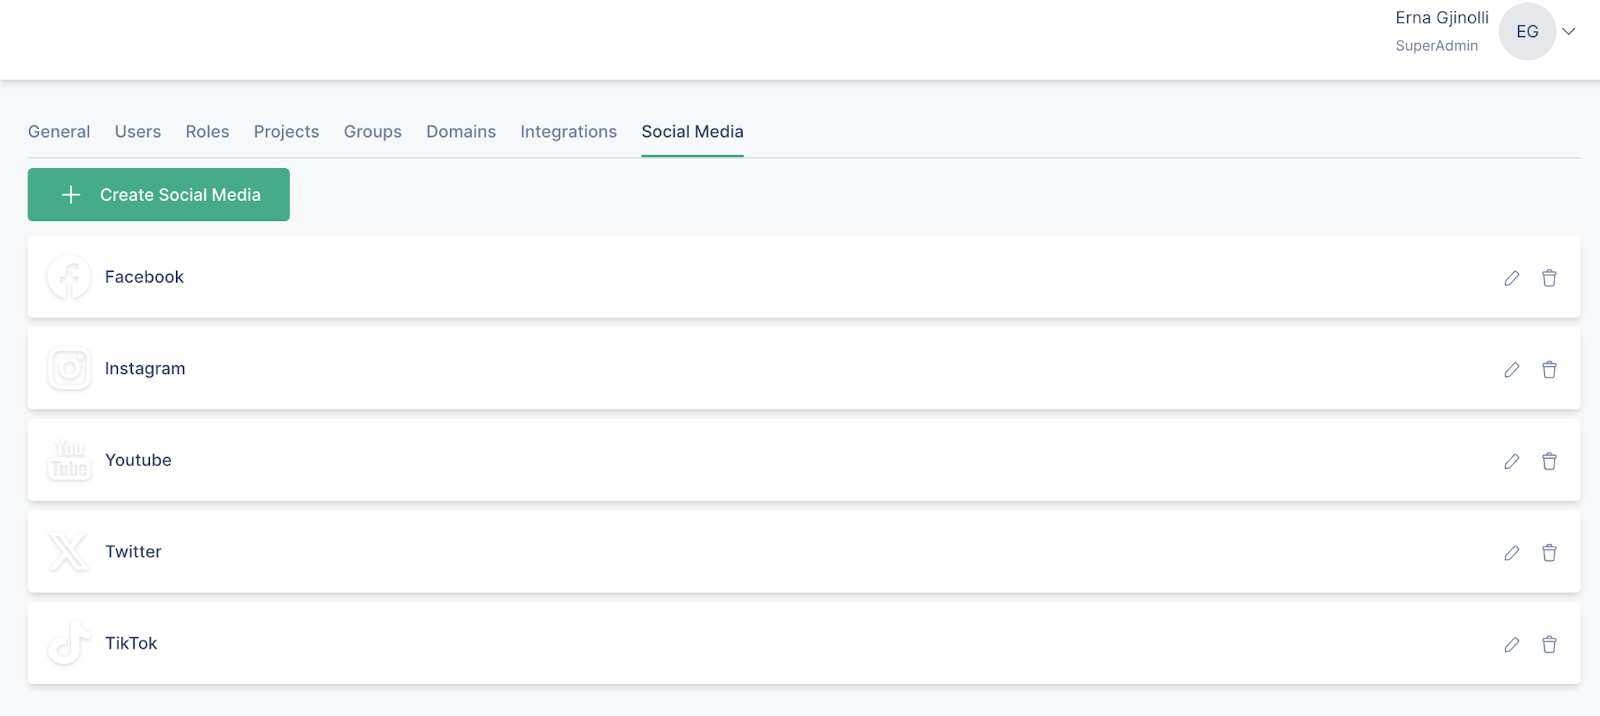
- Click on Create social media
- Add a name and image for the icon
- Click “Save”
- In Project Settings, add the social media links
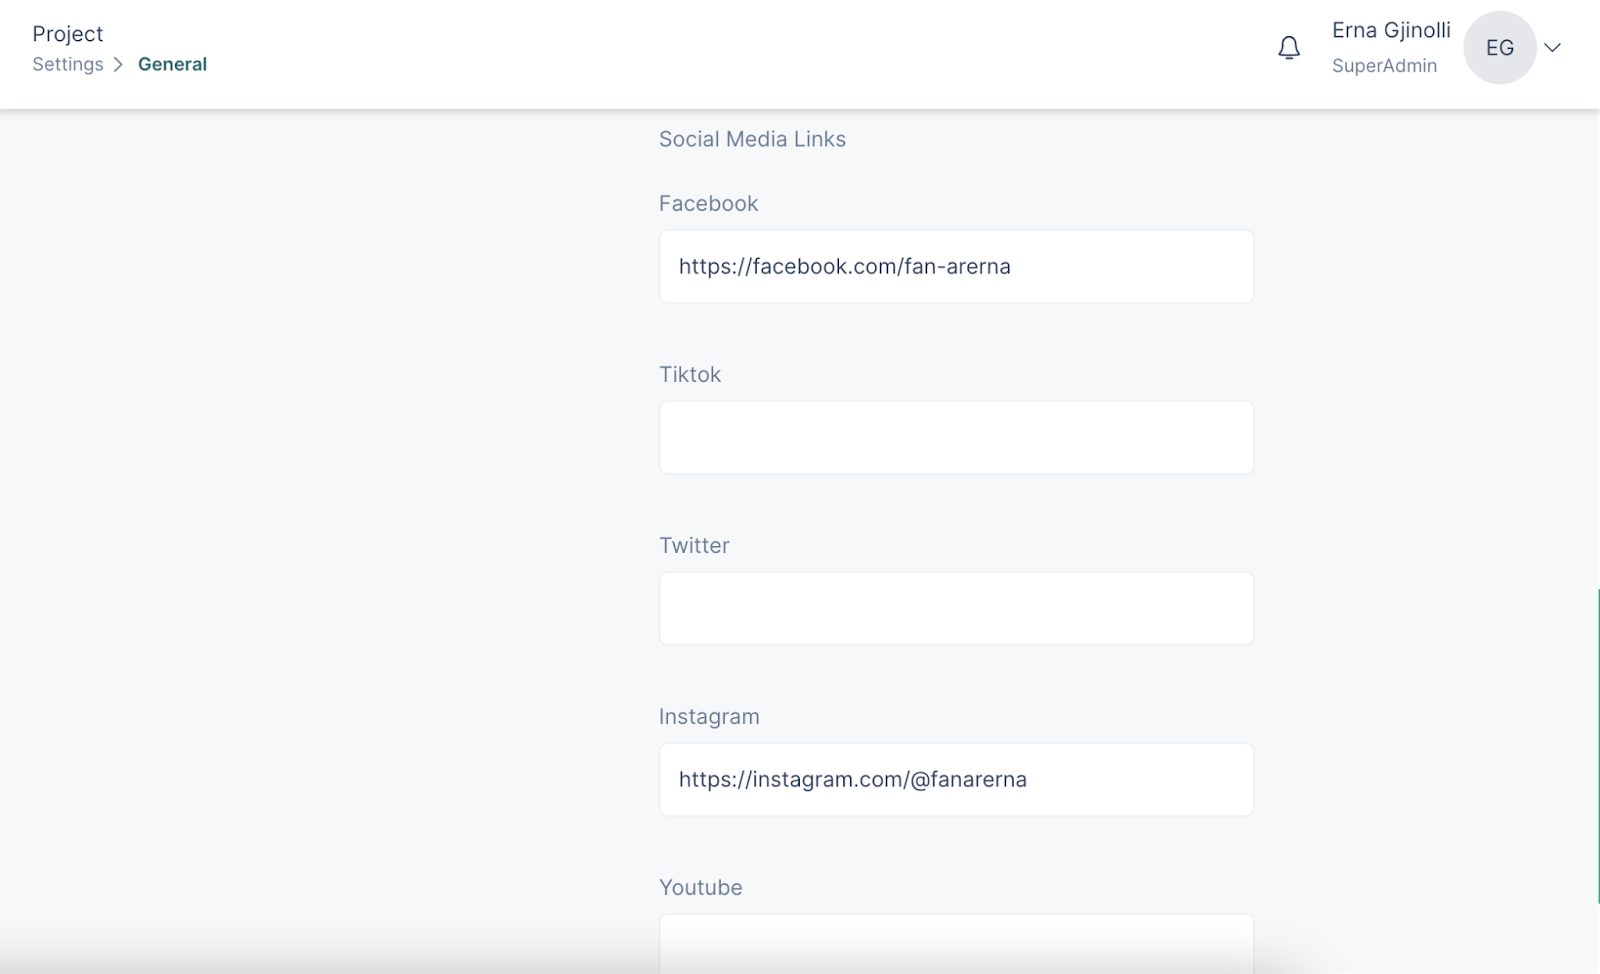
- Click on “Update”